


If you're looking for a way to stand out at your next dressy event, a tie is a way to do it. But how to tie a tie? The answer isn't as simple as it seems: there are many different ways to knot a tie, and each one serves a different purpose.
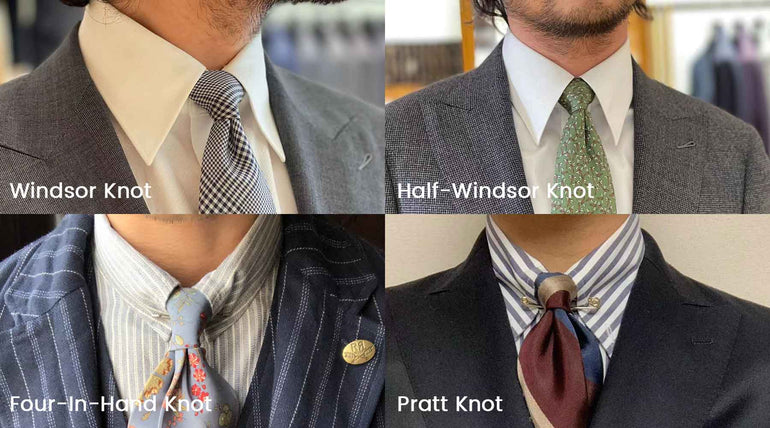
In this article, we'll cover four classic tie knots every man should know: the Windsor knot, the half-Windsor knot, the four-in-hand knot and the Pratt knot.
So, without further ado, let's get started!
1. How to tie a tie simply - The Windsor Knot way!
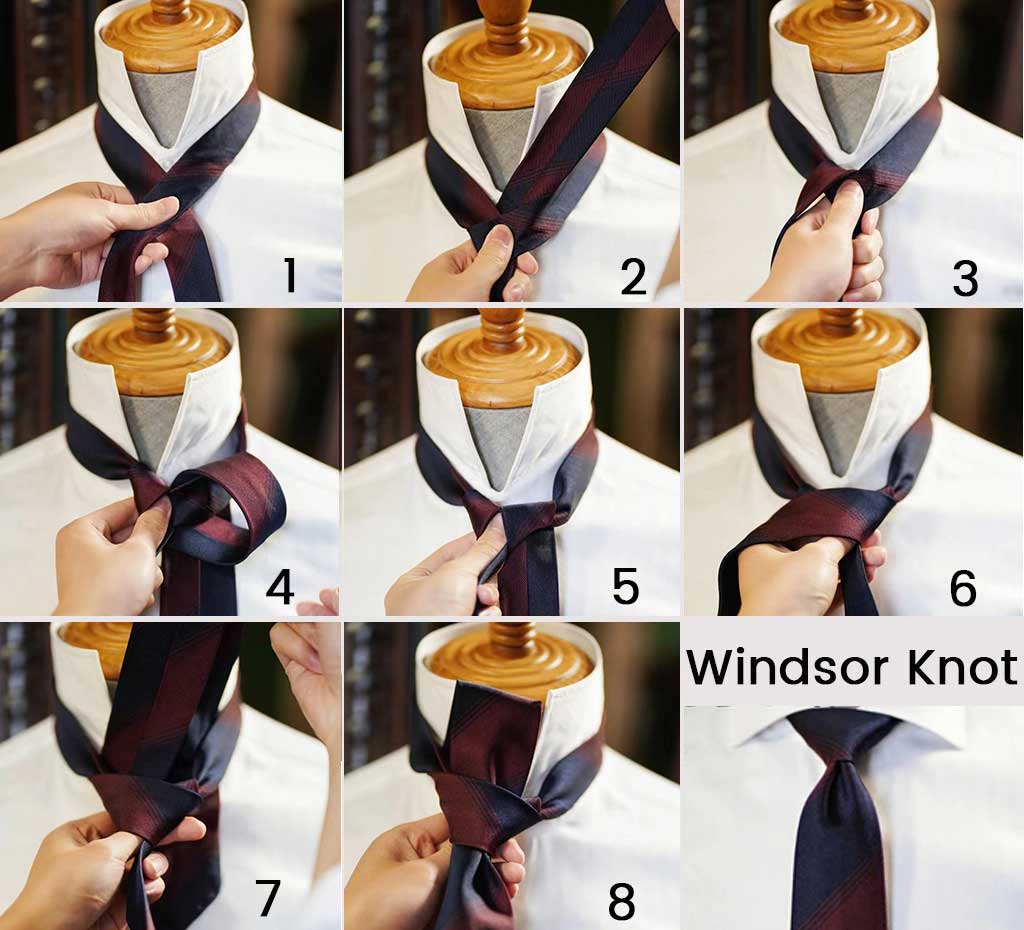
Tying a tie in the Windsor Knot way is pretty easy! To start, you'll need a necktie and a mirror.
- First, hold the end of the tie in your right hand and drape it around your neck so that the long end hangs down on your left side.
- Then, cross the long end over the short end and bring it up through the loop created near your chin.
- Next, take this new long section of fabric and pass it over top of both sections of fabric at your collarbone level before tucking it underneath them towards your right shoulder blade area.
- Now pull all four fabrics tight by holding onto each section with one hand while gently tugging downwards with the other until the desired look is achieved.
- Now that everything is positioned correctly, simply take the longer (left) side of the tie and make a small clockwise motion as you begin passing material over the shorter (right) side - making sure to keep tension on both sides as you go along.
- After about 3-4 wraps/passes, poke the newly formed hole created with the index finger from underneath & then grab the very tip of the shorter (right) side & feed upwards through the hole.
- Then pull completely through to fix any loose ends by readjusting shape/positioning.
2. How to tie a tie- The Half-Windsor Knot way!
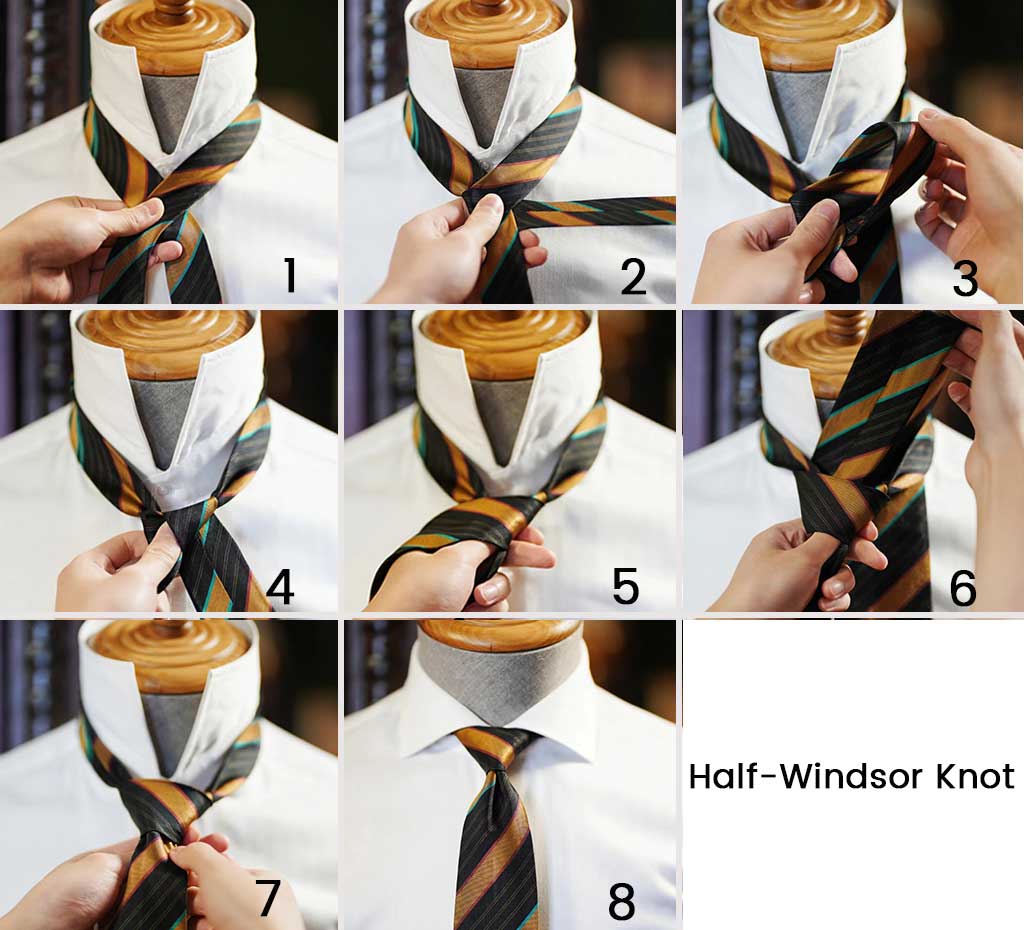
The half-Windsor knot is a great way to achieve a professional look. Here are some easy steps to follow to tie a tie this way!
- Begin by placing the tie around your neck with the wide end on your right side.
- Cross the wide end over the narrow end and bring it up through the loop formed by the crossing.
- Now, with your left hand, hold on to both ends of the cross you just made, allowing the wider portion to dangle down in front.
- Take hold of the wide part now with your right hand and pull it towards the northwest—over top of itself again, creating another loop (or 'bight'). You should still have good tension between both hands pulling in different directions.
- Now poke the wide portion through this new bight holding everything taught, and pull through until it comes through completely, leaving behind a small knot.
- Remove your left hand (which is still holding on to the narrower part), and you're finished!
3. How to tie a tie- The Four-In-Hand Knot way!

The four-in-hand knot is the most common way to tie a tie. It's simple and easy to do, and it looks good on almost any shirt collar. Here's how to do it!
- Start with the tie around your neck and the wide end of the tie hanging down about 12 inches below the narrow end.
- Tuck the wide end underneath the narrow end and cross it over.
- Bring it back up over the top, then poke it through the loop you've created near your chin (this is called the hole).
- Hold on to both ends of the hole as you tighten.
- Then tie the knot by pulling down on the wide end until it is snug against your collarbone.
There are lots of other ways to tie a tie, but this is probably one of the simplest methods!
4. How to tie a tie- The Pratt Knot way!

The Pratt knot, also known as the Shelby knot, is a quick and easy way to tie a tie. It works best with medium-to-thick ties made of wool or synthetic fibre.
The key to this knot is getting the right length; too long and it will look sloppy, too short and it will be difficult to adjust. Follow these steps for the perfect Pratt knot!
- Wrap the tie around your neck inside out, the seam facing away from you. Cross the wide end over the narrow end, making sure that both ends hang down equally on either side of your collarbone.
- Now, take hold of the wide end once more and pull it up through the gap between your collar and necktie, then pull it down, so it hangs in front of the wide end. At this point, you have made a small loop, or a bunny ear, with a wide end.
- Grasp the loose bunny with your non-dominant hand and apply similar pressure. Continue until about two inches (5 cm) remain hanging out past the nape of your neck—these are the tips you'll need later for adjustment.
- Now, take both loose ends in your dominant hand and authoritatively pull one for tightness' sake-but don't knot it yet!
- Fold over the large tips of your dominant hand so that it hangs on one side (either left or right is fine); now, make a similar-sized loop hang down on the opposite side.
- Using your other hand's forefinger, reach up beneath where the large tip hangs and grab it now.
- Hold the first loop and create a second smaller loop (or nest) above the first one, and then take the second loop, which is still dangled free and cross it to the other side of the fed-back under the first loop.
- Finally, wrap your fingers around all four loops and pull the large frontmost loop through the newly formed.
Congrats! You've just learned how to do a Pratt knot.
Conclusion
So, there you go! Four classic tie knots that will help every man who searches for how to tie a tie!
I'm sure we've all had to tie a tie at some point in our lives, but it can be a little intimidating. The good news is that once you get the hang of it, tying your tie will be second nature, and you'll never have to worry about coming up with an excuse not to wear one again.
Are there any other types of ties that you'd like us to cover? Let us know in the comments below!
Ready to dress sharp and command respect with the right accessory? Click here to discover Tonywell, the Professional Accessories Supplier.